Easy Tech Tuts
How to Add Cookie Consent Popup in Webflow Easily 2026
By Impran M N
Building a fully custom cookie banner from raw containers and interactions is possible in Webflow, but the far faster route — and the one actually shown here — is the Apps panel, where a purpose-built Cookie Consent app handles the banner, the accept and settings buttons, and the compliance logic for you. This guide walks through finding that app in the Designer, what its listing tells you before you install it, and the settings panel where you configure where the popup shows and how consent data is stored. It's aimed at anyone who wants a working GDPR-style banner without hand-building the interaction logic from scratch.
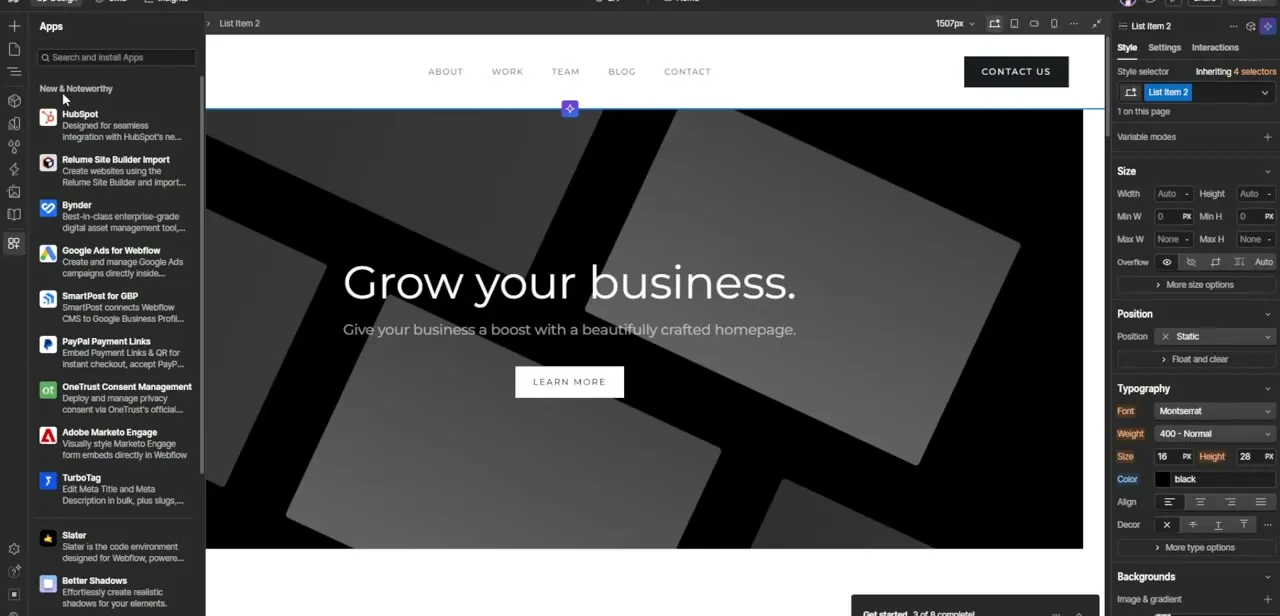
01Open the Apps panel in the Designer
Inside the Webflow Designer, the left-hand rail has an Apps icon that opens a searchable panel of installable extensions, separate from the elements and layers panels you use for regular page building. A New & Noteworthy section surfaces apps like HubSpot, Google Ads for Webflow, and consent-management tools including OneTrust and Cookie Consent, so this is the natural starting point rather than trying to assemble compliance logic by hand.
02Review the Cookie Consent app listing
Searching "cookie" surfaces several dedicated apps — Cookie Consent, Cookie Consent Hub, Flowstar GDPR Cookie Consent, and others. Clicking one opens its detail view with screenshots of the popup, an Install on site button, a like count, and a written breakdown of what it does: customizable appearance, user control over preferences, compliance features, and a read-only versus edit-and-read access permission listed under App permissions. Reading this panel before installing tells you exactly what the app can touch in your project.
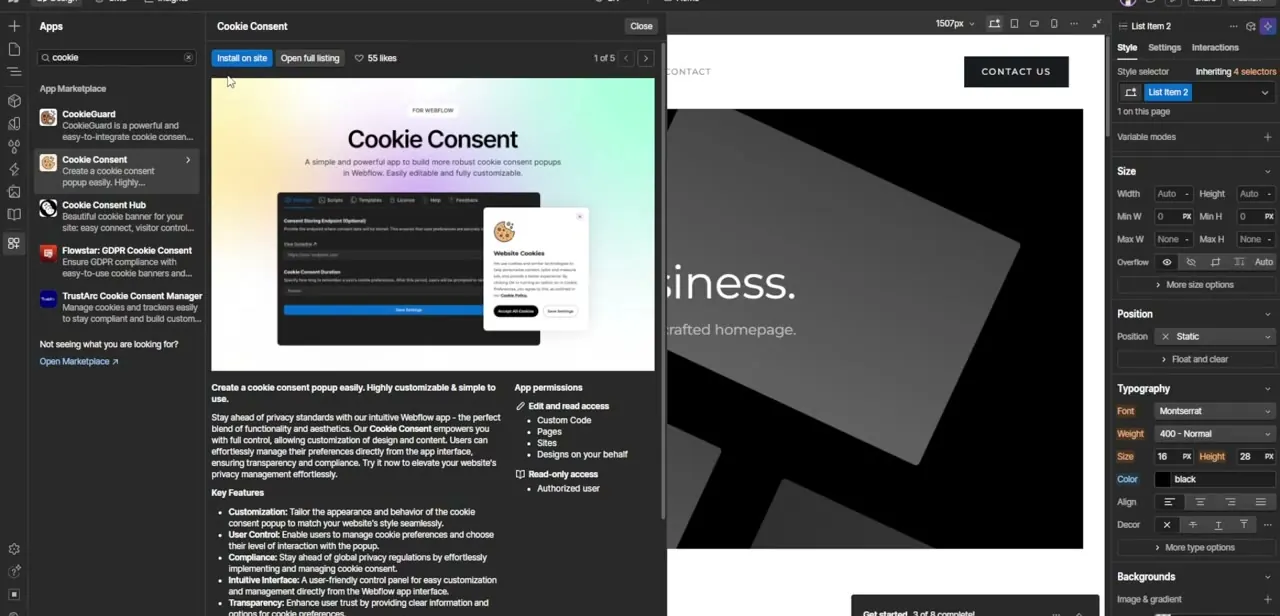
03Install it onto your site
Clicking Install on site adds the app to the current Webflow project. Unlike a purely visual element you'd drag onto the canvas, this app comes with its own configuration surface — you're installing a small piece of functionality plus a UI to control it, not just a styled div.
04Open the app's settings panel
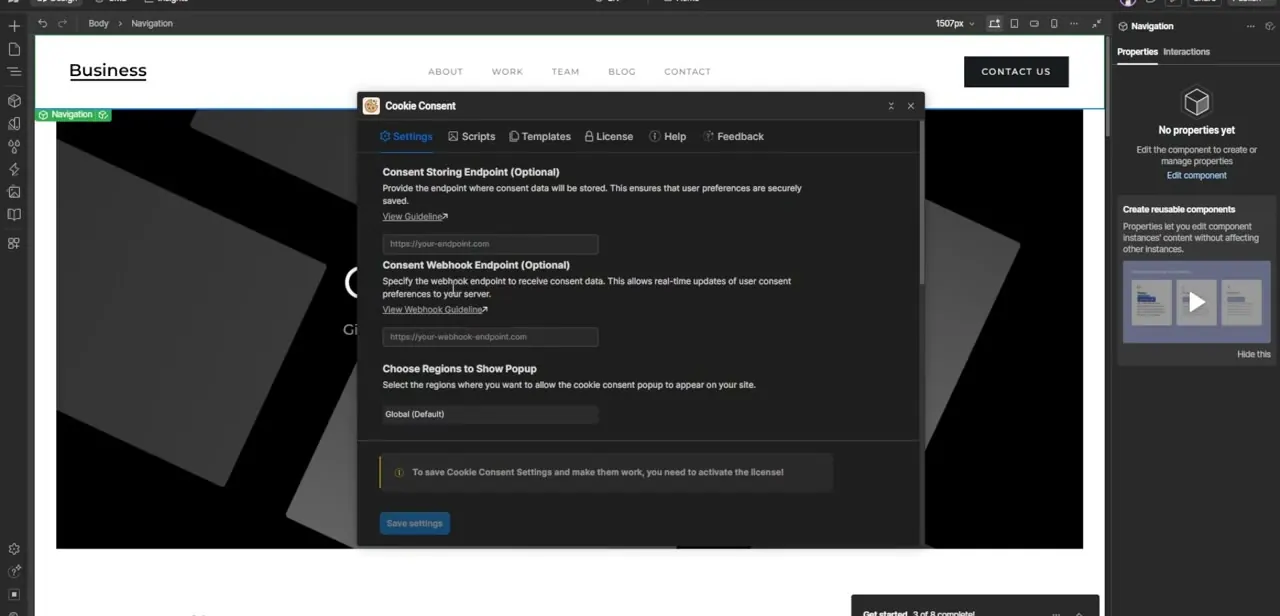
Once installed, the Cookie Consent app opens its own dialog directly over your page canvas, with tabs across the top for Settings, Scripts, Templates, License, Help, and Feedback. The Settings tab is where the real configuration happens: a Consent Storing Endpoint field for where consent data gets saved, a Consent Webhook Endpoint for real-time updates to your own server, and a Choose Regions to Show Popup field defaulting to Global.
05Activate the license to save your settings
A visible notice inside the settings panel warns that you need to activate the license before Save settings will actually take effect — the fields can be filled in, but without an active license the configuration won't persist. This is worth checking before you spend time filling in endpoints and region rules, since a free or trial install may only let you preview the app rather than fully save a working configuration.
06Choose which regions see the popup
The Choose Regions to Show Popup field lets you scope the banner instead of showing it to every visitor worldwide — useful if your compliance obligations are regional, such as GDPR for EU visitors, rather than global. Leaving it on Global (Default) is the safest starting point if you're not sure which regions legally require it for your traffic.
07Publish and verify the banner appears
After saving your settings with an active license, publish the site and load it in a fresh or private browser session to confirm the popup actually appears for a new visitor and that accepting it prevents the banner from reappearing on a repeat visit. Testing from a clean session matters here, since your own browser may already have a stored consent choice from earlier testing.
Frequently asked questions
Do I need a third-party app to add a cookie banner in Webflow?
Not strictly, but the built-in route shown in the Designer is the Apps panel's Cookie Consent app, which handles the banner UI, region targeting, and consent storage without you building the interaction logic from scratch.
Where do I configure the cookie banner after installing the app?
The app opens its own Settings panel with fields for a consent storing endpoint, a webhook endpoint, and which regions the popup should appear in.
Why won't my settings save after I configure the app?
The app's settings panel shows a notice that you need to activate the license before Save settings will actually persist your configuration — check that first if changes aren't sticking.
Can I limit the cookie popup to specific regions?
Yes, the Choose Regions to Show Popup field lets you scope the banner instead of showing it globally, useful if only certain regions require it for your traffic.
How do I know the banner is actually working after I publish?
Load the published site in a fresh or private browser session, since your own browser may already have a stored consent choice from earlier testing that hides the banner.
Watch the full walkthrough
The same steps, demonstrated on screen from start to finish.