 Easy Tech Tuts
How to Connect Stripe With Webflow, Add & Integrate Easily 2026
By Impran M N
Webflow's own Ecommerce plan connects to Stripe directly through a payment gateway setting on the checkout page, but plenty of sites that need Stripe data don't run Webflow Ecommerce at all — a marketing site, a membership page, or a landing page selling a single product through a Stripe-hosted checkout. For those cases, the practical way to connect the two is Zapier: Stripe becomes a trigger, Webflow becomes an action, and the two systems talk without either one needing built-in support for the other. This guide walks through setting up a Stripe account for testing and wiring it to Webflow through a Zap, which is the actual mechanism worth understanding if you're not on Webflow's Ecommerce tier.
01Get your Stripe account ready
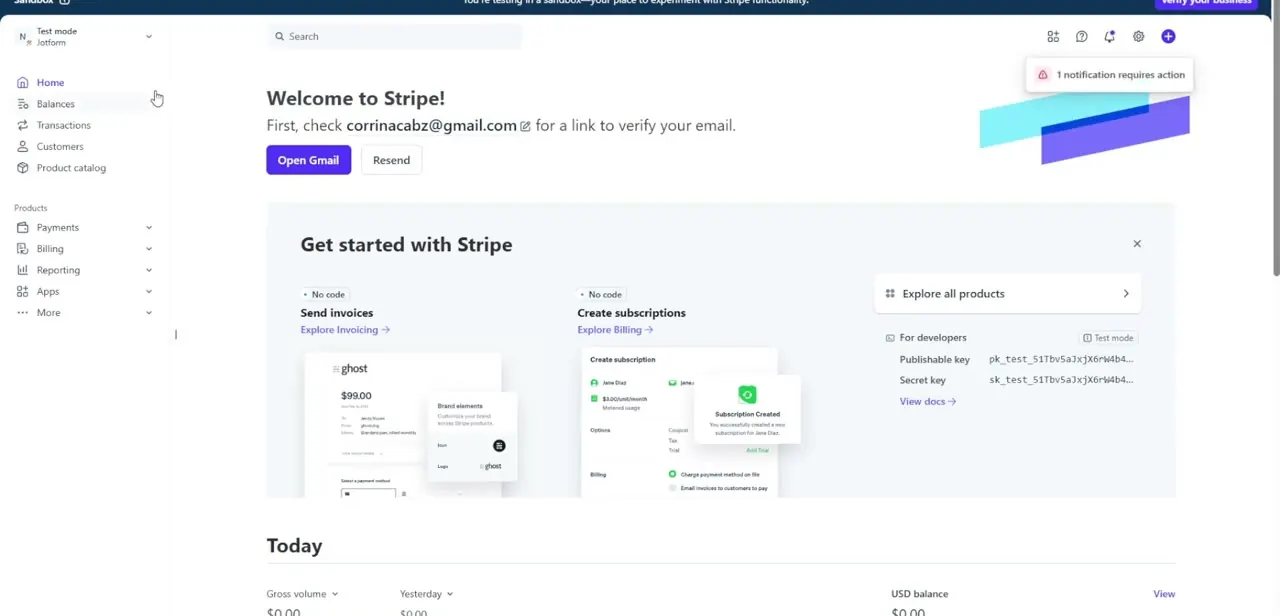
Log into Stripe and you'll land on the account home screen, which in a fresh or sandbox account opens in Test mode — visible as a banner across the top warning that you're experimenting safely rather than processing real charges. Stripe also prompts you to verify your email before anything else, with Open Gmail and Resend buttons right on the dashboard. The Get Started panel below offers no-code paths for sending invoices or creating subscriptions, and further down you'll find your publishable and secret API keys, both prefixed pk_test_ and sk_test_ while you're in test mode — useful to know since those are the credentials any external tool, including Zapier, will eventually need.
02Create a new Zap with Stripe as the trigger
In Zapier, start a new Zap and search for Stripe as the app for step one. Choosing an event here — a new charge, a successful payment, a new customer — defines exactly what has to happen in Stripe before anything fires in Webflow. This is the piece Webflow itself has no visibility into if you're not using its native Ecommerce checkout, which is exactly why the automation route exists.
03Add Webflow as the action app
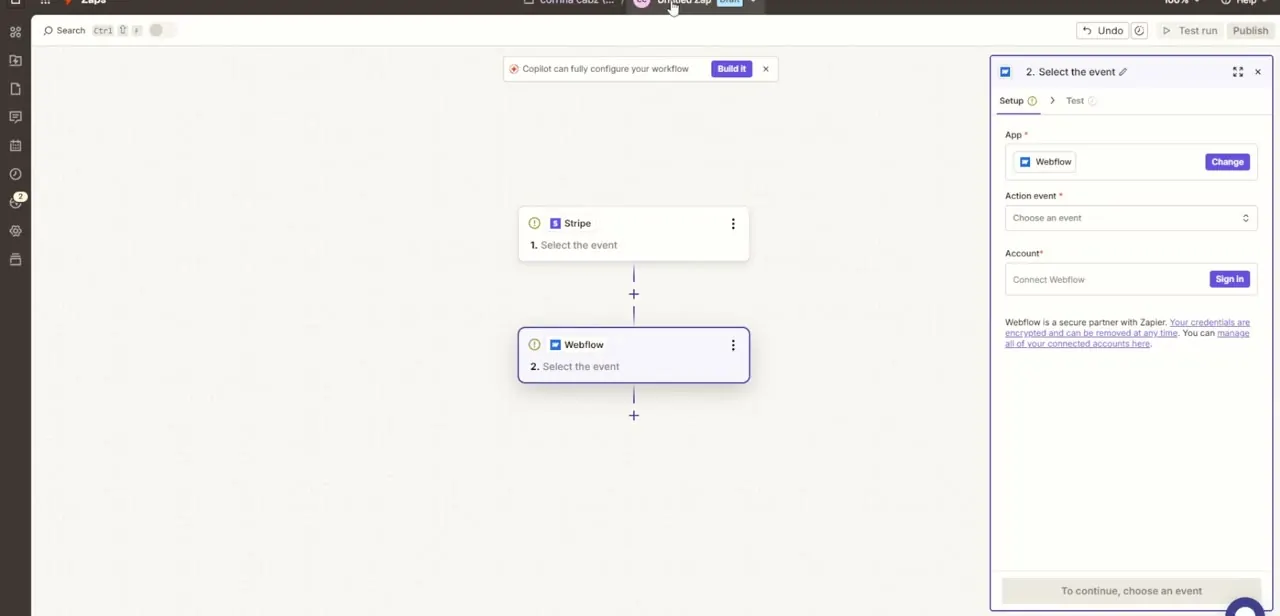
Add a second step and search for Webflow, which opens a setup panel asking for an Action event, then an Account you authorize by clicking Sign In. Webflow's available actions through Zapier typically revolve around CMS items — creating, updating, or publishing a collection item — rather than anything related to checkout, since Zapier is working through Webflow's CMS API, not its payments layer. That distinction matters: this path lets a Stripe event update your site's content, not process a card, which is a different job than Webflow's own Ecommerce Stripe gateway performs.
04Authorize both accounts
Click Sign In on the Webflow step to open its OAuth authorization screen and grant Zapier access to your site, the same way you'd have authorized Stripe on the trigger step. Both connections are stored securely by Zapier and can be revoked at any time from your connected accounts settings — neither app hands its credentials to the other directly.
05Map the fields and test
Once both apps are connected, map the data from the Stripe trigger — customer email, payment amount, product name — into the corresponding fields on the Webflow action, such as a CMS collection's text or number fields. Run Zapier's test step to confirm a sample Stripe event actually produces the expected update in Webflow before you trust the automation with real traffic.
06Publish the Zap
Once the test step comes back clean, switch the Zap from draft to Published using the control in the top right. From that point on, whatever Stripe event you chose as the trigger will automatically push through to Webflow — a useful setup for showing recent purchases, updating a member directory, or triggering a thank-you page update, all without touching Webflow's own checkout system.
Frequently asked questions
Does this replace Webflow's native Ecommerce Stripe integration?
No — Webflow's Ecommerce plan connects to Stripe directly for checkout and payment processing. This Zapier approach is for sites without Ecommerce that still want to react to Stripe events, since it works through Webflow's CMS rather than its payments system.
Is my Stripe login information stored inside Zapier or Webflow?
No — both connections use each platform's own OAuth authorization screen, so your Stripe and Webflow credentials are never entered into Zapier directly.
What can a Webflow action actually do in response to a Stripe event?
Typically it creates, updates, or publishes a CMS collection item, since that's what Webflow exposes through its Zapier integration — it can't process a payment or modify your checkout page.
How do I test this safely before going live?
Keep your Stripe account in Test mode, which uses pk_test_ and sk_test_ prefixed keys, and run Zapier's built-in test step on each part of the Zap before switching it on.
Why would I use this instead of Webflow's built-in Ecommerce?
It's the right fit when your site isn't running Webflow Ecommerce at all — for example a Stripe-hosted checkout linked from a marketing page — but you still want site content to react automatically to what happens in Stripe.
Watch the full walkthrough
The same steps, demonstrated on screen from start to finish.


