 Easy Tech Tuts
How to Use QuickBooks With eBay Easily 2026
By Impran M N
Running an eBay store on top of QuickBooks means the same sale exists in two places until you connect them — once as a listing and payout on eBay, and once as income and fees in your books. QuickBooks doesn't build eBay syncing into the core product; instead it's handled through a connector app added from the integrations panel inside your QuickBooks Online account. This guide shows exactly where that panel lives, what the connection flow looks like, and what to do once it's authorized, so your eBay sales stop requiring manual data entry.
01Get your QuickBooks account ready first
Before connecting anything, make sure your chart of accounts has somewhere sensible for eBay activity to land — an income account for sales, an expense account for eBay and PayPal fees, and a bank or clearing account matching whatever account eBay pays out to. Skipping this step doesn't break the connection, but it means your first sync dumps transactions into "Uncategorized Income" and "Uncategorized Expense," which you'll then have to clean up by hand. A few minutes spent naming accounts before you connect saves a much longer cleanup session after.
02Open My integrations from the QuickBooks toolbar
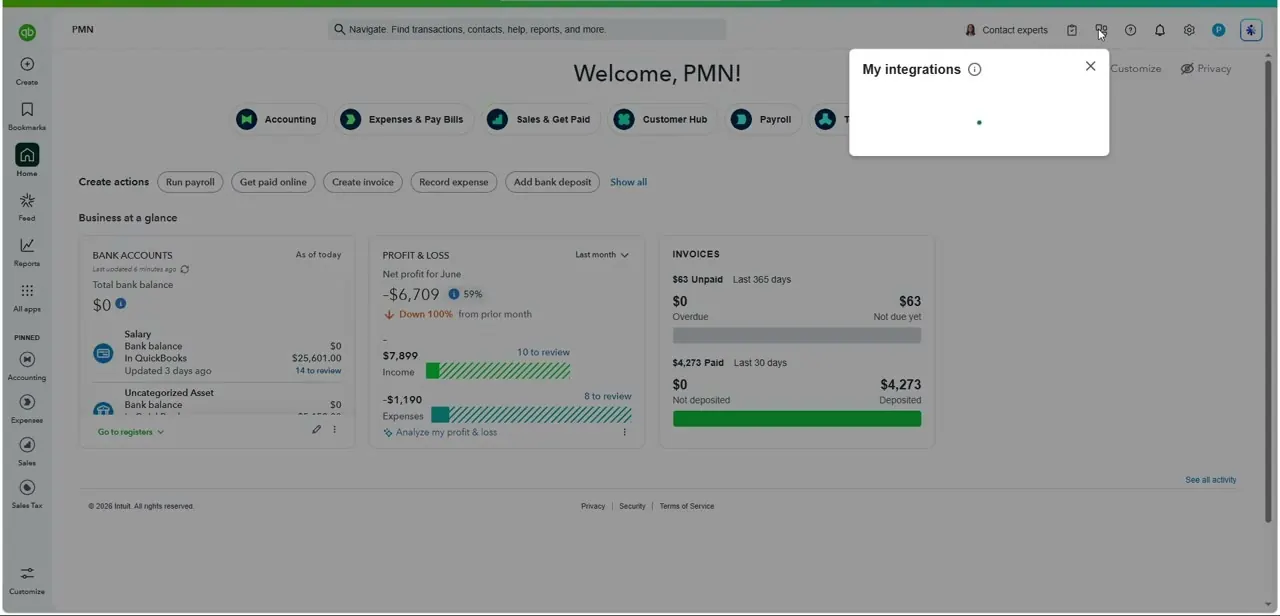
Once you're in QuickBooks Online, look at the icon row in the top right of the screen, next to the help and settings gears — the puzzle-piece style icon opens a panel called "My integrations." This is the hub for every third-party connection attached to your QuickBooks account, not just eBay, so it's worth knowing this is where you'd also manage other apps later. From here you can browse available connectors or jump straight to one you already know you want, which for eBay sellers is the eBay Connector.
03Start the eBay Connector setup
Search for or select the eBay Connector from the integrations list, and QuickBooks walks you into a short setup flow rather than connecting instantly. Read through what the connector will actually do before continuing — it typically covers importing orders, syncing fees, and matching payouts to your bank feed — since knowing this up front makes the categorization step afterward much faster to reason about.
04Authorize the connection between accounts
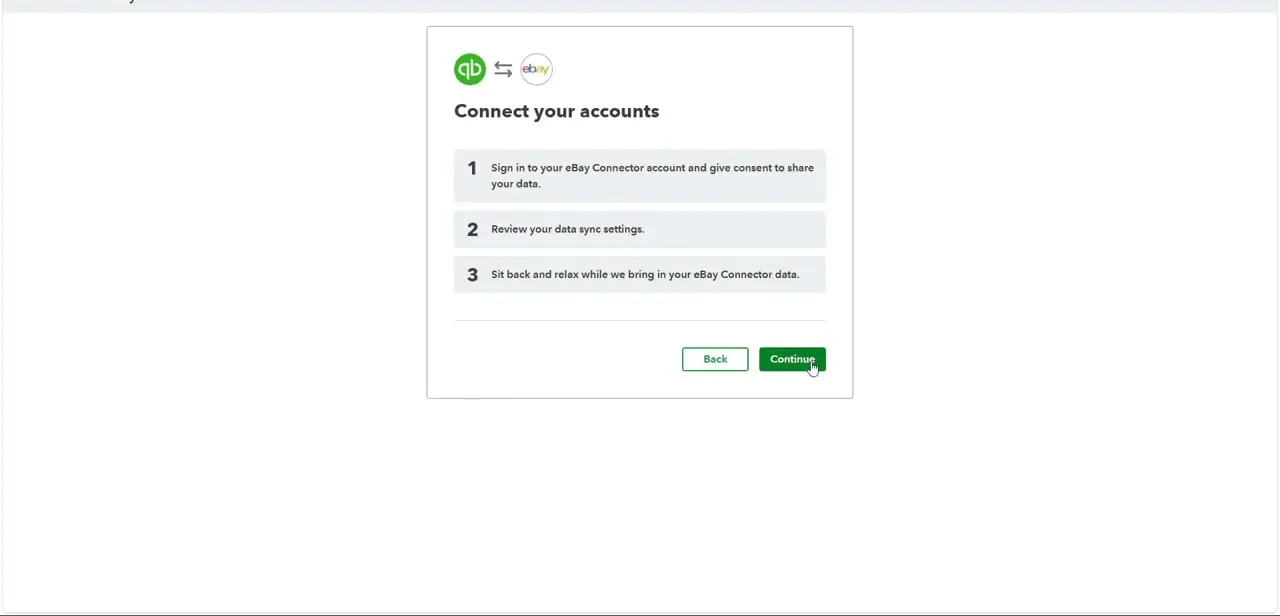
The core of the setup is a "Connect your accounts" screen showing the QuickBooks and eBay logos side by side with three numbered steps: sign in to your eBay Connector account and consent to share data, review your data sync settings, and then wait while your eBay data gets pulled in. Clicking Continue takes you to eBay's own sign-in page to grant permission — QuickBooks never asks for your eBay password directly, since the authorization happens through eBay's login screen. This is the point where you're explicitly granting an outside app access to your selling data, so it's worth using an eBay account you're comfortable connecting long-term rather than a test login.
05Review your sync settings before the first import
After authorizing, you're given a chance to review data sync settings rather than everything importing blind. This is where you decide how far back to pull historical orders, which eBay account or store to sync if you run more than one, and how granular the imported transactions should be — line-item detail versus a single daily summary. Choosing a summary view keeps your QuickBooks transaction list shorter and easier to reconcile, while line-item detail gives you per-listing profitability at the cost of a noisier register.
06Categorize what flows in and reconcile regularly
Once the sync is running, new eBay orders, fees, and payouts start appearing in QuickBooks automatically, but the first batch almost always needs manual categorization until you've set up rules. Spend time in the first week matching transaction types to the right accounts you set up earlier, and QuickBooks will start suggesting the same categorization for similar future transactions. Check the connection weekly rather than assuming it will run flawlessly forever — connector apps occasionally need re-authorization if eBay changes its permissions, and catching that quickly keeps your books from silently falling behind.
Frequently asked questions
Does QuickBooks connect to eBay natively, without any add-on?
No. The connection is made through the eBay Connector app, added from the My integrations panel inside QuickBooks Online, not a built-in feature.
Where do I find the integrations panel in QuickBooks Online?
It's the puzzle-piece style icon in the top right of the QuickBooks Online toolbar, next to settings and help — opening it shows "My integrations" and every app connected to your account.
Does QuickBooks ever see my eBay password?
No. Authorization happens through eBay's own sign-in page when you connect the eBay Connector app, so QuickBooks only receives permission to sync data, not your login credentials.
Will my past eBay sales import automatically?
That depends on the data sync settings you choose during setup — you can typically select how far back historical orders should be pulled in before the first sync runs.
Why are my first synced transactions showing as uncategorized?
New connections often land in generic accounts until you manually categorize the first batch and QuickBooks learns to apply the same category to similar future transactions.
Watch the full walkthrough
The same steps, demonstrated on screen from start to finish.


