 Easy Tech Tuts
How to Print Single Check from QuickBooks Online Easily 2026
By Impran M N
Most payments now move electronically, but the occasional vendor or contractor still wants a paper check, and QuickBooks Online handles that without forcing you into a batch print run. This guide walks through the exact path to a single check — where the feature hides in the menu, how to fill in the payee and category, and what to check before it goes to the printer. It's built for the business owner who needs to cut one check today, not set up a recurring print job.
01Open the Print checks screen from the navigation menu
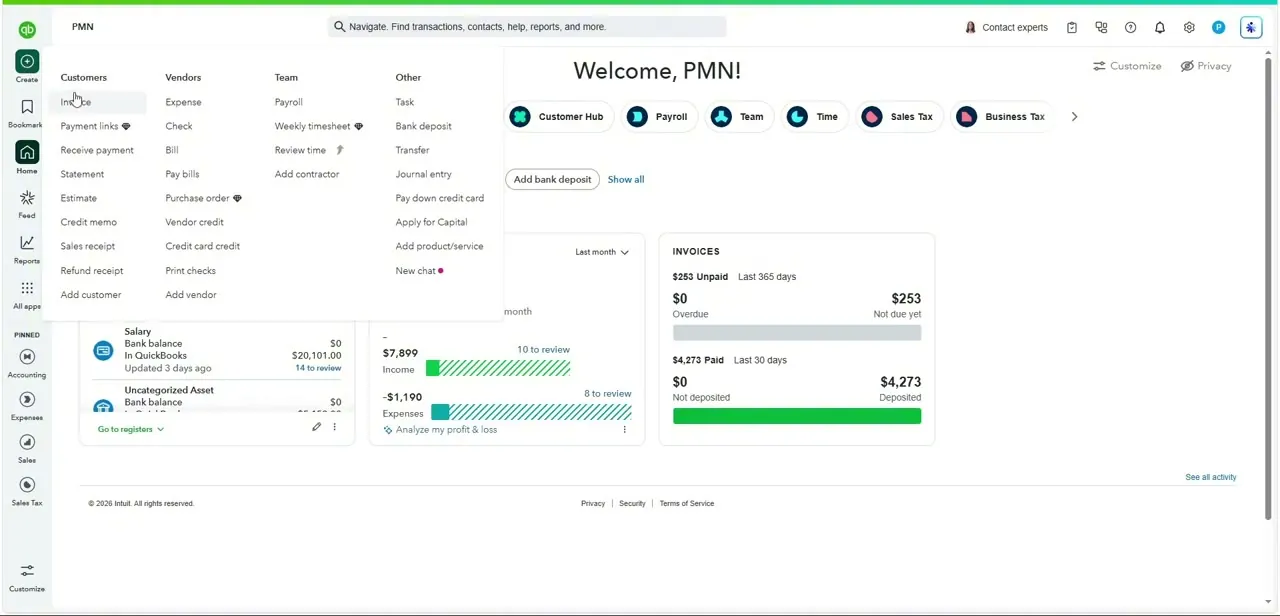
From the QuickBooks Online homepage, click the Create (+) button in the top left, which opens a menu organized into Customers, Vendors, Team, and Other. Check printing lives under Vendors, alongside Expense, Check, Bill, and Pay bills — look for "Print checks" specifically, since a plain "Check" entry records a payment without necessarily marking it to print. This menu is also where you'd go for Pay bills or Vendor credit, so it's worth knowing your way around it if checks are a recurring part of how you pay people.
02Choose the payee and bank account
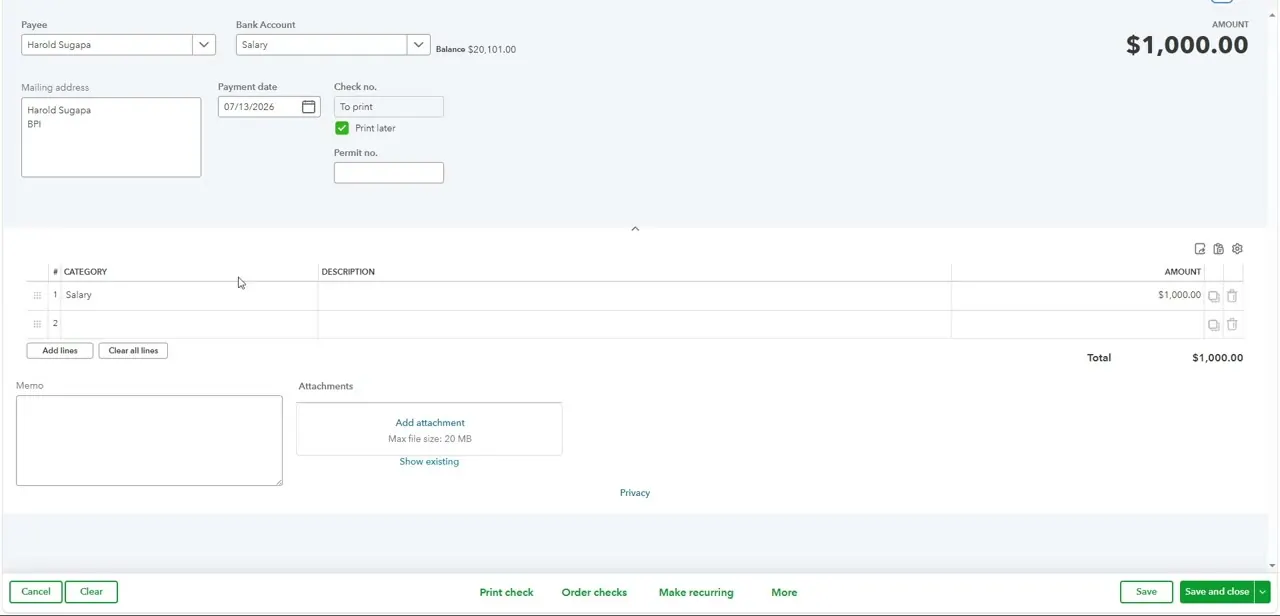
On the check form, select the Payee from your vendor or employee list — QuickBooks pulls in their mailing address automatically if it's on file, which is what ends up printed in the check window if you're using windowed envelopes. Next, pick the Bank Account the check should draw from; the form shows that account's current balance right next to the dropdown, so you can confirm there's enough to cover the payment before you go further. Set the Payment date, and leave the Check no. field alone for now if you plan to print — it will populate automatically based on your check stock once you mark the check to print.
03Fill in the category and amount
In the line-item table below the header, choose a Category — this is the account the payment should post to, such as Salary, a specific expense account, or a bill payment category — and enter the Amount. QuickBooks totals the line items automatically at the bottom, and that total mirrors the amount shown in the top right corner of the form. Add a Description if the payment needs more context than the category alone provides, and use the Memo field for a note that will appear on your bank register even though it typically won't print on the check itself.
04Mark it to print rather than assigning a check number
This is the detail that separates printing a check from just recording one: check the "Print later" box near the Check no. field. Doing so clears the check number field and replaces it with "To print," which tells QuickBooks to hold this check for your next print batch and assign the number from your check stock automatically instead of you typing one in. If you leave "Print later" unchecked and manually enter a number, QuickBooks treats it as an already-issued check rather than one queued for printing — an easy mistake that leads to mismatched check numbers later.
05Verify the details before sending it to the printer
Before you save, re-read the payee name, mailing address, bank account, and amount one more time — the total in the top right is the fastest way to catch a typo in the line items. Once everything checks out, use Print check at the bottom of the form (or Save and close, then print from the queued list later if you're batching more than one). Load your check stock into the printer according to your check type's alignment, and run a test print if this is your first time printing on that stock so the numbers land in the right boxes.
06Keep a record after printing
After the check prints, QuickBooks automatically records the transaction in your bank register with the check number your stock assigned, so there's no separate step to log it. Still, it's good practice to note the physical check number somewhere outside QuickBooks too — a simple log, or a photo of the check before it's mailed — in case you ever need to reference it with your bank before the transaction has cleared. If a check is voided or reprinted, do that from the same transaction in QuickBooks rather than creating a new one from scratch, so your check numbering stays sequential.
Frequently asked questions
Can I print just one check at a time in QuickBooks Online?
Yes. Check the "Print later" box on a single check form and print it immediately from the queue rather than waiting to batch it with others.
What's the difference between "Check" and "Print checks" in the Create menu?
Both record a payment, but only checking "Print later" on the form (accessible from either entry point) queues the check number to be assigned by your printer instead of typed in manually.
Why would a business still print checks instead of paying electronically?
Some contractors or vendors simply prefer paper checks, and it avoids setting up an electronic payment method for a one-off or infrequent payment.
Do I need special check stock to print from QuickBooks Online?
Yes — you need pre-printed check stock compatible with QuickBooks' print alignment, and it's worth running a test print before your first real batch.
Does QuickBooks automatically record a check after I print it?
Yes, the transaction and check number post to your bank register automatically once printed, so there's no separate manual entry step.
Watch the full walkthrough
The same steps, demonstrated on screen from start to finish.


