Easy Tech Tuts
How to Enable DNSSEC With Cloudflare Easily 2026
By Impran M N
DNSSEC adds a cryptographic layer of trust to your domain's DNS responses, making it much harder for attackers to spoof records or poison caches. In Cloudflare, turning it on is a single click, but finishing the job means copying a handful of cryptographic values into a completely different system — your domain registrar. This guide walks through where DNSSEC lives inside Cloudflare's DNS settings, what the generated DS record actually contains, and why that second step at the registrar is the part people skip and then wonder why validation fails.
01Open your domain's Overview in Cloudflare
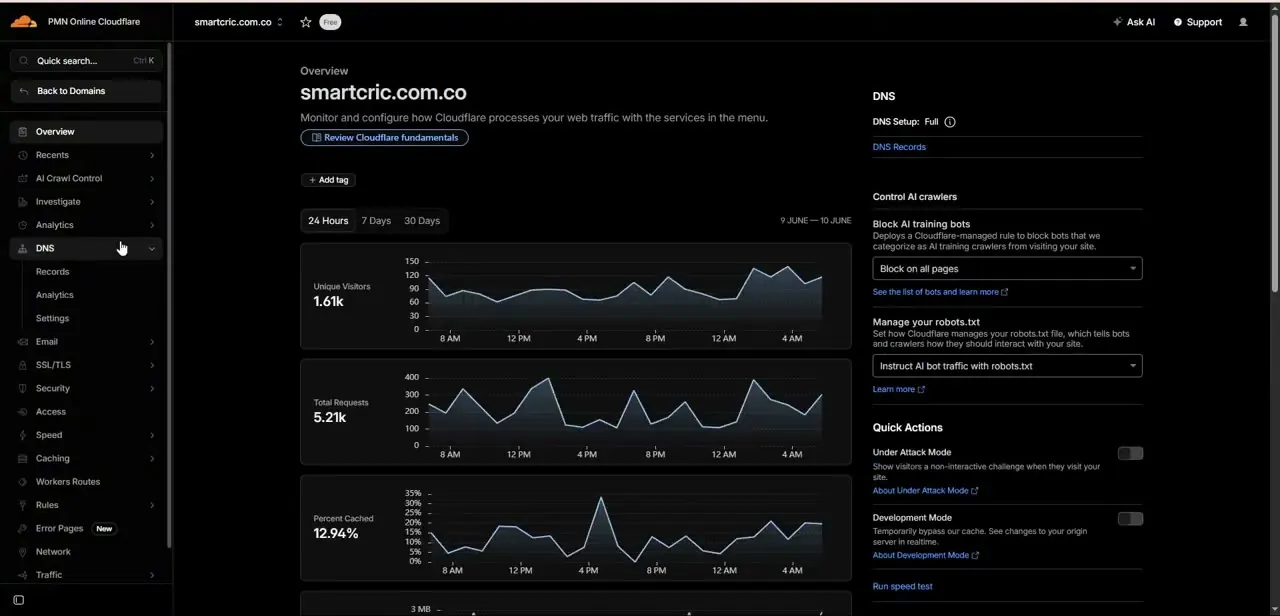
After logging into your Cloudflare account and selecting a domain, you land on its Overview page — traffic charts for unique visitors, total requests, and cache percentage, plus a DNS panel on the right confirming DNS Setup is Full. This is also where you'd notice if your domain isn't yet using Cloudflare's nameservers, which DNSSEC depends on, since the DNS Setup status needs to read Full rather than Partial before signing will work correctly.
02Go to DNS Settings and find the DNSSEC card
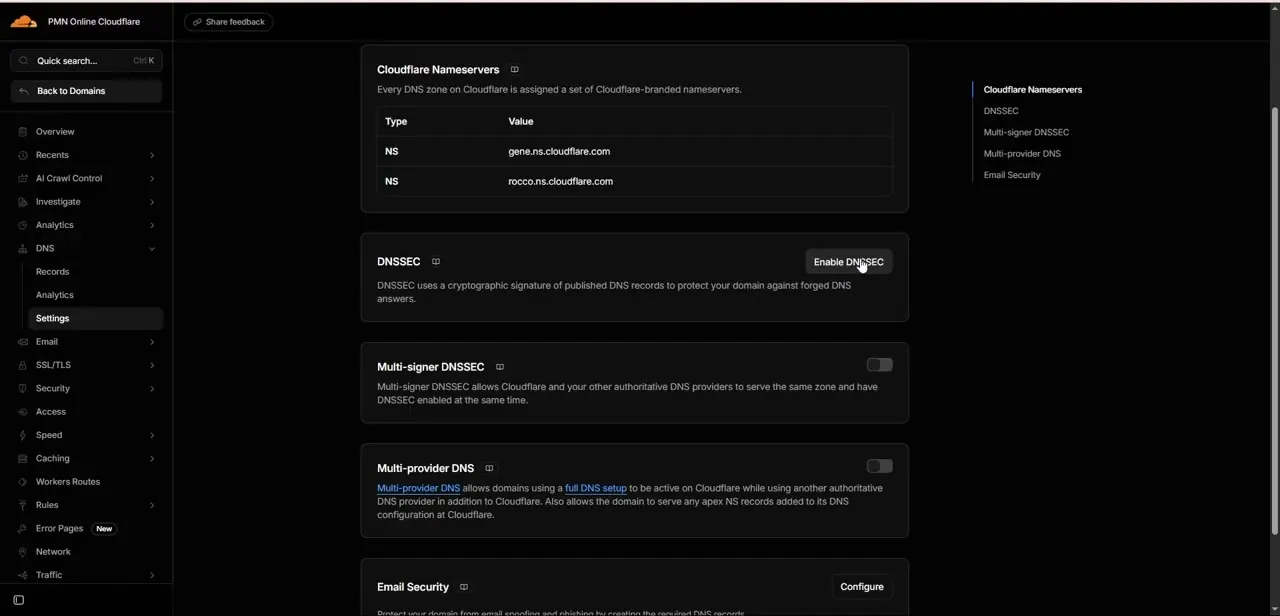
From the left sidebar, expand DNS and click Settings rather than Records — this is a distinct sub-page from the records list, dedicated to zone-level configuration. Scrolling down, you'll see a Cloudflare Nameservers card listing your two assigned NS values, then directly below it a DNSSEC card with a short explanation — "DNSSEC uses a cryptographic signature of published DNS records to protect your domain against forged DNS answers" — and a single Enable DNSSEC button. Further down the same page are related but separate toggles for Multi-signer DNSSEC and Multi-provider DNS, which most single-provider setups can ignore.
03Click Enable DNSSEC and review the DS Record
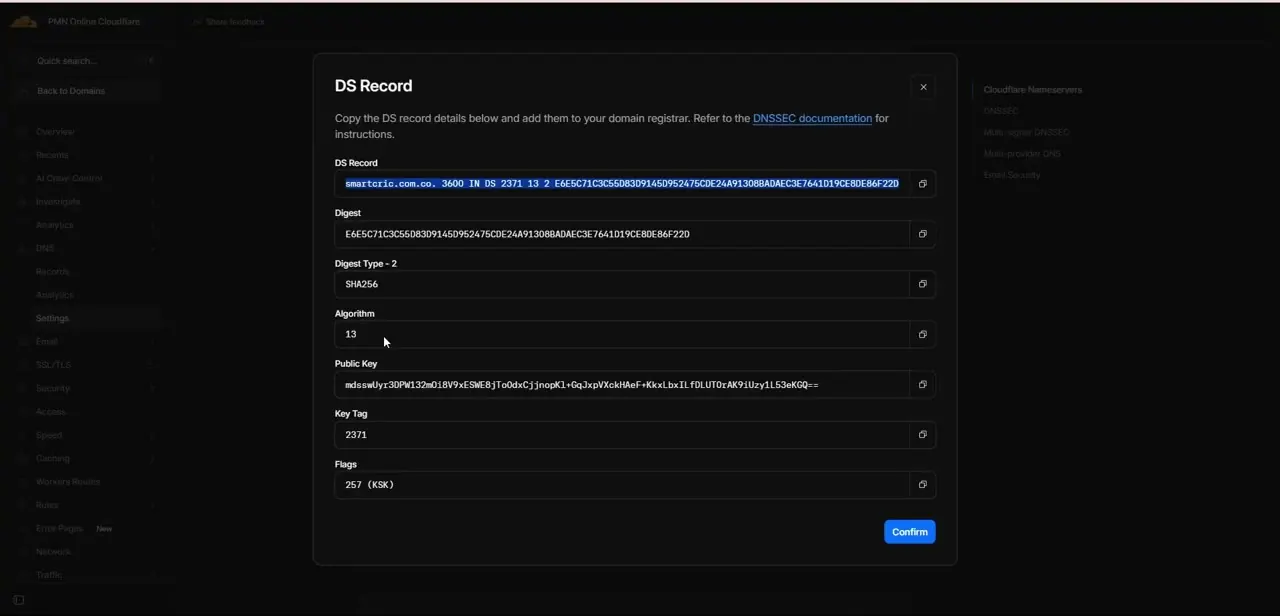
Clicking Enable DNSSEC immediately opens a DS Record modal instructing you to copy the details below and add them to your domain registrar. The modal lists several values: the full DS Record string in registrar-ready format, a separate Digest field, a Digest Type field (SHA256 in this case), an Algorithm field (13), a Public Key, a Key Tag, and Flags (257, marked KSK for Key Signing Key). Every field has its own copy icon, and most registrars will ask for the Key Tag, Algorithm, Digest Type, and Digest as four separate fields rather than the single combined DS Record string, so read your registrar's form carefully before pasting.
04Add the DS record at your domain registrar
DNSSEC only works once the DS record exists in two places: Cloudflare, where it already is, and your registrar's parent zone, which is what actually tells the rest of the internet to trust your signed records. Log into whichever registrar manages your domain — GoDaddy, Namecheap, and Porkbun all have a dedicated DNSSEC section — and paste in the Key Tag, Algorithm, Digest Type, and Digest values exactly as Cloudflare generated them. A single mistyped digit in the Digest field will break validation entirely rather than just degrading it, so copy each value with its copy icon instead of retyping by hand.
05Confirm the record inside Cloudflare
Back in the DS Record modal, clicking Confirm tells Cloudflare you've completed the registrar-side step, which changes the DNSSEC card's status from pending to active. This confirmation doesn't verify the registrar actually has the correct values — it just acknowledges you've done your part — so a typo at the registrar can still leave your domain in a broken, half-signed state even after you click Confirm here.
06Validate the signed status externally
Once both sides show DNSSEC as enabled, use an external tool like DNSViz to independently confirm the chain of trust is intact from the root down to your domain. This step matters because Cloudflare's own dashboard can only tell you what it sees on its end — an independent validator checks the whole path, including the registrar's parent zone, which is exactly where a bad copy-paste would show up as a broken link in the chain.
Frequently asked questions
What does DNSSEC actually protect against?
DNSSEC establishes an authenticated chain of trust for DNS responses, protecting against attacks like cache poisoning and DNS spoofing.
Do I need to enable DNSSEC at both Cloudflare and my registrar?
Yes. Cloudflare generates the signing keys and DS record when you click Enable DNSSEC, but you still need to copy that DS record's Key Tag, Algorithm, Digest Type, and Digest into your registrar's DNSSEC settings to complete the chain of trust.
How long does it take for DNSSEC to become active after enabling it?
Once the DS record is added at your registrar, activation can take anywhere from a few minutes to a couple of hours depending on propagation and your registrar's processing time.
What happens if I enter the wrong DS record values at my registrar?
Incorrect values, especially in the Digest field, can cause your domain to fail DNS validation entirely, making it unreachable. Copy each field with Cloudflare's copy icon rather than retyping to avoid this.
How can I confirm DNSSEC is fully working after setup?
Use an independent tool like DNSViz to check the full chain of trust from the root down to your domain, since it verifies the registrar's side too, not just what Cloudflare's dashboard shows.
Watch the full walkthrough
The same steps, demonstrated on screen from start to finish.