Easy Tech Tuts
How to Configure MX, SPF, and DKIM for a Cloudflare Easily 2026
By Impran M N
If your domain's DNS lives in Cloudflare, that's also where you have to fix email once you move providers or launch a new mailbox — pointing MX records at your mail host and proving your outgoing mail is legitimate with SPF and DKIM. Get any one of the three wrong and mail either stops arriving or starts landing in spam. This guide walks through finding the right domain in a Cloudflare account, opening its DNS panel, and adding all three record types correctly, including the one setting that trips people up every time: keeping mail records off Cloudflare's orange-cloud proxy.
01Find your domain in the Cloudflare dashboard
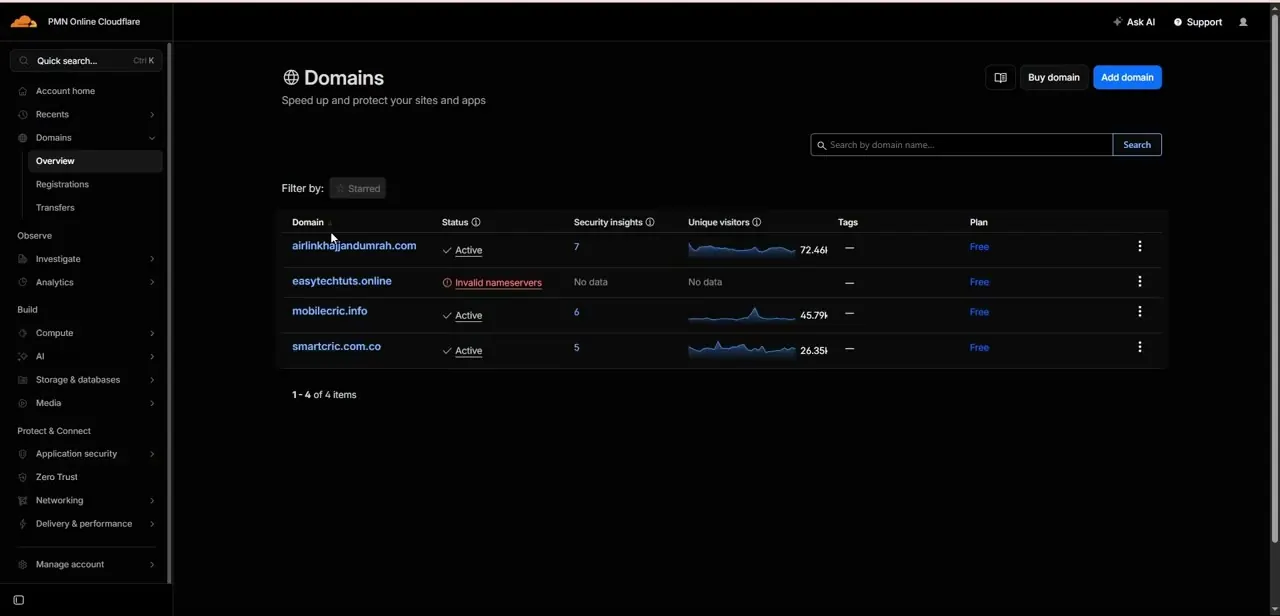
Log into Cloudflare and land on the Domains page, which lists every site connected to the account with its status, security insights, and plan. If you manage more than one domain, this is where you confirm you're about to edit DNS for the right one — a status of anything other than "Active" (like "Invalid nameservers") means DNS changes won't take effect until that's resolved first. Click the domain you need to configure mail for to open its overview.
02Open the domain overview and jump to DNS
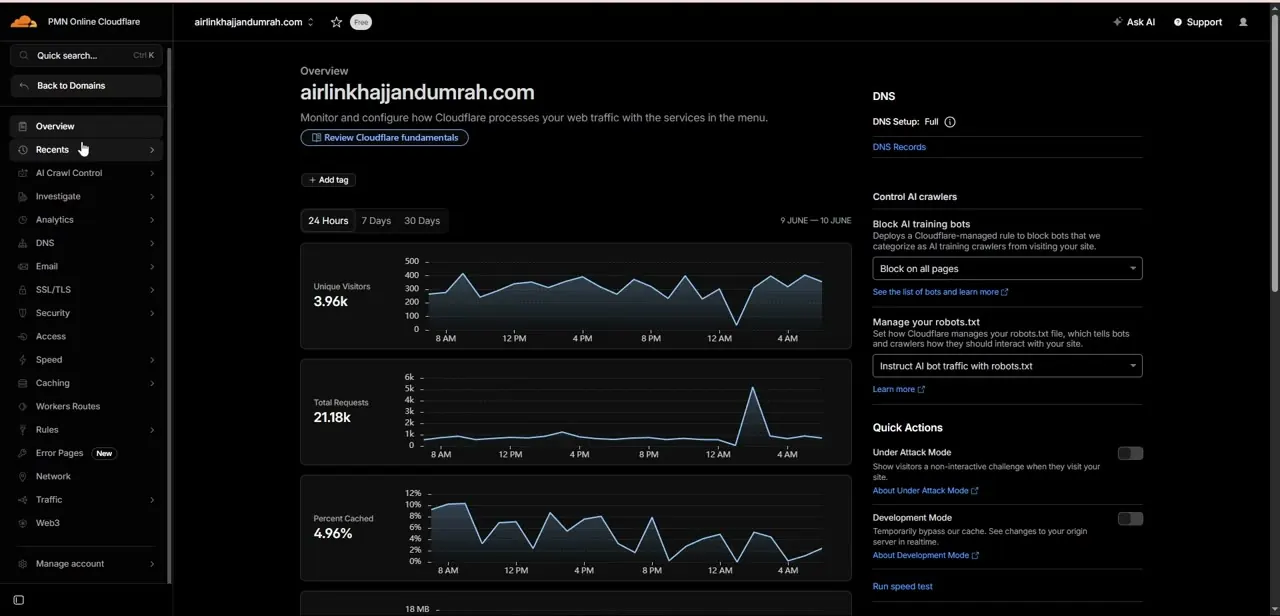
The domain's Overview page shows traffic and request stats at a glance, but what you actually need is in the right-hand column: a DNS Setup indicator and a DNS Records link. That's the entry point for every record you're about to add. The left sidebar also has a dedicated DNS section further down if you'd rather navigate there directly instead of using the shortcut link.
03Add the MX record for your mail host
In DNS Records, click Add Record and switch the type dropdown to MX. Leave the name as your root domain (or the @ symbol, depending on how Cloudflare labels it) unless your mail provider tells you to use a subdomain, then paste in the mail server host address they gave you — something like mail.yourprovider.com. Set the priority number they specify; lower numbers are tried first, which matters if your provider gives you more than one MX record for redundancy.
04Create the SPF record as a TXT entry
SPF isn't its own record type in Cloudflare — it's a TXT record with a specific string format. Add a new TXT record on your root domain with a value starting v=spf1, followed by the include or ip4 entries your mail provider requires, and ending in ~all or -all depending on how strict you want failed checks to be. If a TXT record already exists at that name for a different purpose, don't create a second one — most providers only read the first SPF string they find, so you may need to merge entries.
05Add your DKIM selector and public key
DKIM also goes in as a TXT record, but at a selector subdomain your provider assigns, something like selector1._domainkey.yourdomain.com. Copy the exact selector name and the public key string from your mail service's admin panel and paste the key as the record's value without adding line breaks. A single missing character in that key is the most common reason DKIM validation fails after everything else looks right.
06Set every mail record to DNS Only
Once MX, SPF, and DKIM are all saved, scroll through the list and check the cloud icon next to each one. It needs to be gray (DNS Only), not orange (Proxied) — Cloudflare's proxy is built for web traffic over HTTP, and mail servers querying these records directly will fail if the answer comes back proxied. TXT and MX records are usually DNS-only by default, but it's worth confirming after any bulk import or migration, since a stray proxied record is a quiet way to break mail delivery without any obvious error.
07Confirm delivery is working
DNS changes can take anywhere from a few minutes to a few hours to propagate fully, so don't panic if a test email doesn't authenticate right away. Send yourself a message from an external address and check the headers, or use your mail provider's built-in DKIM/SPF verification tool if they have one, to confirm all three checks pass before you consider the migration done.
Frequently asked questions
Why do my mail records need to stay on 'DNS Only' instead of proxied?
Cloudflare's proxy is built for web traffic; mail-related records like MX, SPF, and DKIM need to resolve directly (DNS Only) so mail servers can read them correctly.
What happens if I skip SPF or DKIM?
Without SPF and DKIM, your outgoing email is more likely to be flagged as spam or rejected outright by receiving mail servers that check for sender authentication.
Can I have more than one MX record?
Yes, many mail setups use multiple MX records with different priority values as backups in case the primary mail server is unavailable.
Where do I get the DKIM key values to paste into Cloudflare?
Your email service provider (such as Google Workspace or Microsoft 365) generates the DKIM selector and public key, which you then copy into a TXT record in Cloudflare.
How long does it take for new MX, SPF, or DKIM records to start working?
Cloudflare usually applies DNS changes within minutes, but full propagation across every mail server that queries your domain can take a few hours, so wait before troubleshooting a failed test.
Watch the full walkthrough
The same steps, demonstrated on screen from start to finish.